Showing posts with label Our Home. Show all posts

Monday, August 22, 2011

I'm in love... with a mirror... no really!

I saw this mirror a few months ago at Pier 1, at the time for $250. You know me, I love a good deal, so I couldn't bring myself to spend that much on a mirror. Even if it was super beautiful and unique, I just couldn't do it.

 via Pier 1

But, I have thought about it over and over again since then. It's one of those purchases I didn't make, that I look back on and wish I did.

Not only that, but I was continuing to get reminded of my love for the honeycomb mirror via Pinterest and other bloggers (here, here and here for example). Apparently I wasn't the only one loving this mirror.


Well, I just so happened to be in a Pier 1 the other day with my sister, and what did I see? The mirror! In the clearance section for only $100. It was missing a couple of the smaller mirror pieces, but I knew those would be easy to find and replace if I did a little shopping online. Still, $100 for a broken mirror? hmmm...


So, I asked the sales associate if they could bring the price of the mirror down any lower.  I'm usually not very good at wheelin' and dealin' but I knew this was a mirror from the spring season, and it had a couple missing pieces after all. Sure enough, she brought the price down to $50! Wahoo!
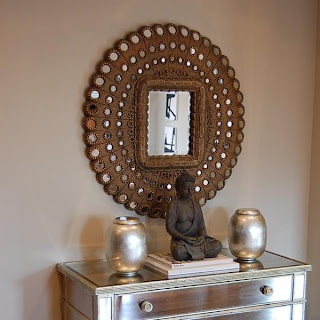

Now, I have one last problem: the hubster (husband). He's not so in love with this mirror, in fact, he kind of hates it. I know it's a statement piece, and I probably should have asked his opinion in advance since it's so huge, I just felt like I couldn't pass up the opportunity since I had been thinking about it for so long.

What if I lost my last chance to get the mirror?


I am of course super curious what you think! Let me know - do you love it or hate it? Leave me some love in the comment section! Part of me likes that it's so pretty and shiny but also kind of rough - it looks almost nautical for some reason, like a sea creature. Am I going crazy over here?

P.S. Here are two last images, of a similar mirror from Wisteria for almost $2,399 - makes my deal even sweeter, right?
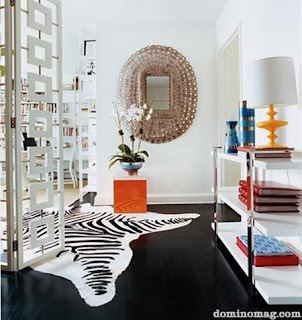
image via Domino

image via Wisteria

Friday, June 10, 2011

Bathroom Remodel Reveal

Today is an exciting day - revealing our bathroom remodel! This room was first on our list to fix up in our home, so I am super happy that it's freshened up and looking so much better.

Just as a reminder of where we were before, here are a few quick photos. But, to see the full tutorial and information on our wallpaper removal, check this out.

The first two photos are from the first time we saw the house at the Open House, and the last photo was taken after the wallpaper was removed, but wanted to be sure I had a decent shot of the grape light fixtures. 
 Grape light fixtures, seashell wallpaper and pink water themed laminate: 

Brown shower tiles:

Grape Light Fixtures: 

Now for the after photos!! We stuck with the brown tile, but used blue Martha Stewart paint and updated the light fixtures (and of course removed the wallpaper).

When we moved in, the shower was missing a shower head and shower curtain rod. So, our first steps were getting those two things at the hardware store. We also got the same shower curtain featured on one of my favorite blogs, Young House Love.


We were surprised when we visited hardware stores that Lowes had a better lighting selection for bathroom fixtures than Home Depot. Lowes had a pretty cool section where you pick out the base / finish vanity fixture you want, and then there are a variety of shades for you to choose from

It was a nice option for us to choose a more modern fixture, but still tie in the vintage brown swirls you see in the shower tile and flooring. 

We replaced the hardware (towel rod, robe hook and toilet paper holder) at Home Depot. 

Rugs were purchased from TJ Maxx. Small table and plant from Ikea. 

Flowers are from my garden!


Lastly, a quick list of what we would still like to accomplish in the bathroom:
  • Raise up the vanity
  • Frame the bathroom mirror (I see this DIY project in my future this fall)
  • Replace the countertop
  • Replace the sink
  • Get the tub professionally reglazed
So, there you go! That gives you a snapshot of where we started, where we are now, and what is still left for finishing our bathroom remodel project. I am really pleased with the results so far, it feel so far away from the dated feel before, with a much more fresh and clean feel.

Are you loving any projects you've finished up lately around the house?

Wednesday, May 25, 2011

SURPRISE! It's Party Time!

I had a great time planning birthday surprises for my husband, Kyle, this year! He has had a crazy year, so I wanted to surprise him with some extra loving from close friends and family.

We started off with a low-key birthday week by opening gifts at home, and having takeout Tony's pizza on his actual birthday while we sat outside and enjoyed the view from our backyard. It was lovely. We also spent time with his parents on his birthday-eve, and my parents spent time with us the night of his birthday for dessert.

This year, his birthday gift from me was a new salmon rod to do some fishing right out of our backyard! I got him the rod, reel and line, and my parents got him some tackle and a big new fishing net. His parents got him an awesome pair of binoculars, which we have used at least once a day since he got them! This is a fun photo the night he got his new fishing gear:


But, it wasn't about the gifts this year, it was mostly about the surprise! The Saturday after his birthday, I threw a big surprise party for him, and he had no idea! The best part is, I was able to keep a secret. Normally I am really bad at keeping birthday secrets, so I was proud of myself that he really had no clue come Saturday afternoon when he showed up at home to a bunch of his screaming family and friends. Here are a few photos my friend Sarah took of the party (thanks for helping document this special day, Sarah!!):

 Kyle is super surprised! Yes!


I created tissue paper party pouf's for my fireplace mantle,
which had various family photos displayed that I framed as part of Kyle's birthday gift


I got lots of help with the food for the party! Thanks friends and family!


 My friend, Liz, made these awesome cupcakes. She needs to open a cupcake cafe, I think!
The flags were super cute but still guy-appropriate.


I printed off family photos of Kyle when he was young to display on our coffee table.
This was with the help of my sister-in-law, thanks Heather!


 My peonies are just starting to bloom. Perfect timing for a party!

We also got to put to use my newly upholstered chairs!

Overall, the party was a huge success. Kyle was surprised, and it felt so good for all of us to spend time with family and close friends to really celebrate him this year. The sun didn't come out much for us, but we were still able to enjoy our patio in the typical Pacific Northwest weather!

What about you guys, did you do anything fun or suprising last weekend?

Monday, May 23, 2011

Spring Tip: Hardening Off Your Plants

Hey there! I haven’t posted in while – but it’s all been good stuff! Catching up on some things around the house and in the garden, weeding my little heart out, planting new plants and veggies in a few pots, and most importantly getting ready to celebrate my hubby’s birthday last week! I threw him a surprise party on Saturday with close friends and family, and we had a great time. He was definitely surprised - success!! I will do a post soon with some photos from the party.  

This is a fun photo of Kyle and I from my
aunt and uncle's wedding last summer!

For now, I did want to pass along this quick tip on hardening off plants I saw on the Seattle Tilth website that I found to be helpful. I have recently purchased some veggies for our vegetable garden this year, and I had them in the garage to start hardening them off for about a week. Hardening off your plants is all about slowly adjusting them to the current weather and temperature, especially with some of the wind, rain and cold temperatures we’ve had around here. The plants have been so used to greenhouses that it’s important to slowly get them ready to be outside full time, so they don’t go into shock! My plants enjoyed a couple nice days outside, too, before I planted them in the garden. More photos to come! 
For today, here is a fun iPhone photo of my backyard last week. Come on, Spring!

P.S. We have visual confirmation that the culprit to our garden vandalism is a river otter (or multiple otters!). More to come…

Monday, May 2, 2011

Bathroom Remodel Sneak Peek

Well, long ago I mentioned my distaste for the seashell wallpaper, grape lights and pink water laminate countertops in our main bathroom. In the beginning of the 2011 New Year as part of our Winter Project List, I started scraping off the wallpaper. Now, months later, we've really made some solid progress on the bathroom renovation! We've painted, changed the light fixtures, removed all the hardware so we can start from scratch, and we got a new simple white shower curtain. It's made a world of difference and has really given the space a fresh, clean feel.

Here is a little sneak peek photo teaser, with more before and after photos to come as we finish up the
details in the bathroom this week.

We went from these old grape lights...

... to this simple, more classic fixture with brown swirls
in the glass to match our floors and shower tiles.

More to come - stay tuned! 

Wednesday, April 20, 2011

Bird Love

We just posted about our Bird House Love because of our recent bird house construction project, and wanted to follow-up with some actual Bird Love. Since we put up the bird houses, we’ve been enjoying some bird watching out one of our big windows in our living room.  


 We were  skeptical that the birds would even be interested in the new bird houses this season since we just put them up, but I think because they are in the same location and look so similar to the old bird houses, they have been extra interested.  We’ve also noticed they’ve been doing a little love making of their own, so maybe with Spring being here they’re extra into our bird houses to build nests?  


We’ve seen birds going busily in and out of the houses with little twigs to build the nests, which is so fun to watch. Glad our little birdies are happy!

Tuesday, April 19, 2011

Bird House Project

One of the things on our Home Spring Project List was to figure out what we wanted to do with our bird houses, which were on the backside of our garage near our patio. Check out a before photo here:


We were trying to determine whether we wanted to refinish the existing bird houses, or just build or buy new bird houses. After getting them down from the garage, we determined pretty quickly that new bird houses were the way to go. The old bird houses were made of really thin wood and had peeling paint, and they were stuffed to the brim with yucky nests. To be honest, I’m not sure how our little bird friends even got inside, I’m telling you, they were stuffed full! I was secretly hoping for a cute little nest inside, but that was not the case. Check it out: 


So, we knew at that point we wanted to build or buy bird houses. I took a trip to Lowes and Home Depot, and determined that the bird houses were way too expensive. Most were $15-$25 each, even for the simple wood houses, and they were pretty small.  We solicited the help of my dad since he had all the tools we would need, and he gladly accompanied me to the hardware store to check out our options for construction materials.

We decided to get simple cedar planks so that we wouldn’t have to do any painting, and got about 6 boards for around $10. We also got some heavy duty fencing screws that wouldn’t rust, especially since we were leaving them exposed with the cedar and they wouldn’t be painted. Those were another $10 (which we could definitely use for future projects), so the grand total of our materials for three houses was only $20. Nice!

My dad was a huge help, he did most the work and I mostly gave him design ideas. We used the old bird houses as a template, and built them together at my parents house one Saturday. We used a wood sealant to help keep the wood looking nice for years to come. Here’s a photo of us in progress, working on the bird houses. My biggest task was sanding them down and putting the sealant on the wood afterwards. 


Here is a shot of the inside of the bigger bird house. We made smaller nesting cubbies inside so that each bird would be able to nest separately, and then made holes for each of those cubbies.


Then, we had to wait for a good day to put them up. It seemed like every weekend it was rainy, so we waited and we waited, and waited some more. Finally, one week night at dusk when it was nice outside, we decided to just go for it and put these babies up.  My mom and dad came over, and he put them up with a bit of my help.


So, here is one more thing we’re crossing off our Spring Project List. Love that feeling!   

We also want to give an extra big shout out of THANKS to my dad, it’s his birthday today! Happy Birthday, Dad!  Thanks for all your help this past year! Love you!